2010-11-12

Girdle book (part 4)

It's time to update some of my "work in progress" posts, so here is something about the little girdle book again.
First of all, it turned out quite different from what I originally had in mind...

I decided against a cover made of silk for two reasons:

The friend that is going to use it is a craftsperson, not a rich member oft nobility. So a book bound in silk might be a little bit over the edge - and then I found this picture of a very cute girdle book with a striped leather cover that we both liked very much.

Decision made :-)

The girdle book bound in silk is not totally off my agenda though - I just somehow moved it from the to-do-list onto the wishlist ;-) Now I have to find the perfect text for it. Maybe it's going to be the catechism the Dance of Death is from...  

Back to the little girdle book:

The leather I was going to use for the cover is a very smooth, cream coloured sheeps leather tanned with oxalic acid. Unfortunately, dirty fingerprints stay on easily...

Normally books are blindtooled after attaching the leather to the boards - but here I had to do the blindtooling first. The parallel lines were drawn with a heated blunt knive (really blunt, not only "not really sharp"!) along a wooden ruler. That worked quite nicely and I hope it won't wear off during use.

I glued the leather to the wooden boards with animal glue, which has a great advantage here: You don't have to soak the leather with glue as with wheatpaste, you just apply the glue to the boards.


This way its a lot easier to make sure the blindtooled lines stay parallel than with wobbly wet leather :-) 

On the top and on the sides of the boards the leather was folded around the edges and glued to the inside of the board. Extant leather on the corner was cut away and the edges were additionaly secured by sewing (I don't have a picture at the moment). At the top of the back the leather was folded inside and glued in place so that you can see the silk wrapped headband. 

Five little cast flowers were riveted to the boards as both decoration and protection for the leather surface. Now I have to attach the clasp (you can already see the holes for the nails in the picture above) and finish the loose part of the leather with a cord just like on the original or gather it in a turks head knot - depends on the future owners choice :-)


2010-11-08

Dance of Death - Totentanz

For my friends birthday last week I wanted to make something unique - so I did :-)
As I know of his fascination of the socalled Dance of Death (Totentanz in german) motif, I was looking for a faksimile of one of the early printed versions from the 15th century, but found none...


But thanks to a german library I got some scanned images in good quality of the Dance of Death from the "Heidelberger Bilderkatechismus" (illustrated catechism from Heidelberg), printed between 1455 and 1458. So all I had to do was print them on handmade paper and make a small book out of it...

Here is the result:

As there are only 28 pages in the book, it was too small to bind it as a codex (binding with more than one quire and wooden boards). So I used a sheet of sturdy parchment and made a kopert out of it. The 7 leafs of paper are gathered in one quire and sewn through the parchment cover with a waxed linnen thread. The flap closure of the kopert is simply closed with a fine leather thong, wound around the book. A simple, flexible but rather sturdy binding for such a small book: It's only 10cm high!
 
On the first page is an illustration from the Bilderkatechismus that is not really a part of the Totentanz, but I thought it made a good frontispiz... It is titled "von der unausprechliche freyde des ewigen lebens und auch der peyn der hellen" (of the unmentionable joy of eternal life and also the pain of the hells) and shows a really comic-like depiction of hell in the lower right corner: Some monsters mouth full of flames with two people and a devil inside, all grinning sheepishly.

Then there is one page with a short text about how inevitable death is for everybody, regardless of wealth or social status. And then the dance begins... On 25 pages Death in the form of a skeleton / decaying corpse is shown dancing with people, from emperor to little child and everyone in between. Here you see him with an abbot on the left and a jurist on the right. Death takes them by the hand and adresses them in a short speach, printed above the illustration. The answer of the person is always below. Here, as an example, is what Death says to the jurist: "Das ortil yst alzo gegeben, Das ir lenger nicht sullet leben. Her jurist das tut des tod sanft, Mogit ir zo beweisest ewr meisterschaft." And the jurist answers: "Keyn appelliren zu dezir zeit, Hilft des todis harten streyth. Her obirwint myt seynem geflecht, Das geistliche und das weltliche recht."


2010-10-26

Small codex part 2

After preparing the boards and spine, the book was finally ready for it's leather cover...


I used bark tanned calf skin for the cover - it has a relatively fine grain, is smooth and strong and has a nice colour due to the chesnut bark used. The leather was cut to size and the part of the leather that will be folded over the edges of the boards was thinned using a paring knive.    


Here you can see my little glue pot - its just a small period mug that I use to warm the animal glue on a little stove. Animal glue is only usable when warm and quickly cools down to a kind of jelly. I like working with it, you have to be rather quick or work only smaller areas at a time, but as there is not so much water inside the glue it does not soak through leather or paper. Some people say that it smells bad - but in my experience that only occurs when the glue pot is used over several days without cleaning. After all, animal glue is a feast for bacteria as long as its not dry... Once dried, it stays strong yet flexible for decades (even centuries).   

2010-09-15

Small codex part 1

For some time yet I've been working on a small codex - a book with wooden boards. It's going to be a notebook for a medieval craftsman, so the book is rather small and simple. 

After folding the handmade paper and gathering it into quires / sections, I took strips of rather sturdy leather to sew them onto. These bands have a slit, so the thread goes from the quire up through the slit, around the band and down through the slit into the quire again. 

This makes a distinctive sewing pattern typical for the late medieval codex. After sewing all the quires to the bands, I made boards. The boards are ash wood, because it is is hard, tough and does not work a lot once it is dry. It was not as common for boards as oak or beech, but because of it's fast growth it may have been a cheaper alternative... The boards have grooves for the bands made with a chisel and I smoothed the surface and thinned their edges using a handplane.  

Attaching the bands to the boards is done here in a rather simple way - they are glued into grooves. There are other ways, but for a small book this method was used as some originals show. After the glue has dryed, the bands are cut with a paring knife so nothing will be visible once the leather cover is attached. 

The cords of the headbands are also glued to the boards and strips of chamois stuck unto the spine between the bands to make a smooth surface.

To be continued...

Frilled headware - details

As promised, here are some more detailed photos of the border of my "Kruseler".
You can see the plain weave in tabby with a double thread weft in the left part of the border and the protruding weft loops in the right part.

I simply attached it to the selvedge of a rectangular linnen veil :-)

On the next photo you can see the border going round the corner - from the original paintings of Conrad von Soest I got the impression the women are wearing headscarfs with 4 sides of frill...

The advantage is that I can wear the veil in at least two different ways now: I can either fold it twice and pin it to my braids or fillet as shown here or I can wear it unfolded, draped around head and neck like in the last photo.   


2010-08-30

Frilled headwear...

...can easily become an obsession, so be carefull ;-)
Isis from Medieval Silkwork can tell you a lot more about it - here is just a quick glimps on my new frilled veil.

As the process of weaving a veil with a frilled border is really slow and I don't have much time to weave at the moment, I got a bit impatient. I just had to make something I could wear now, not next year...

It's a simple rectangel of handwoven linnen cloth bordered with a narrow linnen band. The band has two different edges: the straight edge is sewn to the cloth, the other edge is curved and forms the frill. 

There are some pictures of this type of frill painted by Conrad von Soest (e.g. on the altar of the Stadtkirche in Bad Wildungen, painted around 1403).


You can even see the different colour of the frilled border on the lower edge on Marys veil:

On another painting you see a tiny line above the frill - so I think this could be some kind of band sewn to the cloth... 

I got lucky and found a border of handwoven linnen with one straight and one curved edge on a piece of vintage linnen from the 19th century that I could use for my veil :-)

The curves are formed by small loops of the weft protruding from the warp.
Technically not very difficult and quite similar to the woven garter with a dagged edge from 14th century London...


Unfortunately I don't have a good photo of me wearing the veil in this style at the moment, just one taken from the side while I was explaining something to a bunch of visitors... 


2010-07-27

Tame lions

Back from our holiday - visiting museums, what else ;-) - I started sorting through more than 600 photos...
Here is something from the Domschatzmuseum in Regensburg for all who are interested in brocaded tabletweaving:

So called "Wolfgangskasel" (chasuble of St. Wolfgang), dating around 1050.
Patterned silk fabric with embroidery and brocaded tabletwoven bands, "reconstructed" in the 15th century when they used some new silk fabric to fill all the holes in the original garment. Today only little of both fabrics is left, most of the darkgrey fabric is from the latest restoration...

Taking pictures without flashlight was allowed, so thanks to the museum for that!!!

The tabletwoven borders are really georgious, they have a repeating design of birds and lions between flowershaped things and little spacing patterns. The warps is red and almost-black silk, woven in 3:1 broken twill. The dark threads form part of the pattern together with the red that are also the binding threads for the brocading.

The central pattern is bordered by a small row of patterns on each side - they are rather worn, so in most parts of the bands you can not really see them any more.

Here you can also see part of the embroidery done in gold and silk and the linen background.


Luckily for us today the lowest part of the chasuble is quite worn over all, so the gold has almost completely rubbed off from the tablet weaving and you can see whats under the brocading :-)


Here you can clearly see the dark warp threads forming the pattern on a red background.
If you think you now these cute little lions from somewhere - I think they are in Collingwoods book in the chapter about 3:1 broken twill. I'm not really sure for I don't have my book here at the moment.
Nancy Spies mentions this garment and its borders in "Ecclesiastical pomp..."  on page118, 120 and 121. In her list of surviving brocaded bands it's called "Band on the chasuble attributed to St. Wolfgang, bishop of Regensburg 11th/13th century"
Unfortunately she states that the original is in Vienna, so don't be confused if you don't find it imidiately looking for a band from Regensburg as I did...
A big "Thank you!" to aislingde for pointing me in the right direction!!!

2010-07-02

decorative woolliness

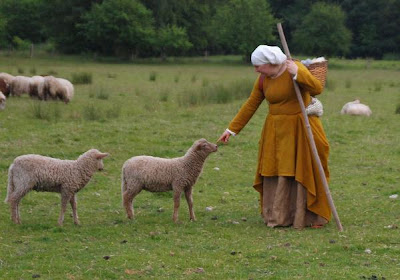
We used one of the last evenings before shearing to take some late 15th century shepherding photos with all the sheep still in their full "garb". The day after tomorrow they will all look kind of sheepish with their fleeces gone ;-)

After collecting period ilustrations with women as shepherds (anybody who read "The wee free men" will know why I don't use "shepherdess"!) for a while, I thought it was high time to take pictures with my flock before going to an open air museum to "play" with the local sheep. After all, my woolly friends would be really upset with me, if I would only use foreign sheep as models ;-)

So here they are in their full decorative woolliness:


Two friendly new faces in the herd - Coburger Fuschsschaf x Wendsleydale Longwool lambs.


Gabrielle, the cuddliest of this years lambs. When she was born, she was so small we really feared she would not make it. But with a very strong will to survive and a charming personality she grew from a strange looking alien into a cute little sheep :-)


Glynn, the sheepdog of my friend Birgit also agreed to pose with me :

She's a real help when we have to herd in the sheep for health checks etc. They are very nice and come to us when we call them to get treats like dry bread - but they just know when we plan "something nasty" like controlling their feet or deworming...
Then Glynn saves the day with her fast paws and sheepsense.


And last, but really not least, another cuddly sheep: Dietrich von Bern. He's one of my rams (actually, not really mine...) and a big softie. He loves getting human attention - others leave, when all the bread has been munched, Dietrich stays and wants to be stroked. Walliser Schwarznasen (Blacknose sheep from swiss region Wallis) are generally very friendly, but I think he's something special. According to breeding standarts his big black spot on the left shoulder is not allowed, so he was originally due to meeting the butcher...

But I was looking for a Walliser Schwarznasen ram as a present for my friend at the same time and so Birgit brought us together. Since then Dietrich is one of my favorites -  and he really was a success as a present, you should see Dietrich and Andi together!

Well, I think you really should, so I'll show you two more photos instead of one:


2010-06-24

It won't get better if you pick at it...

...or will it?
As you may have noticed, I'm trying to find a layout for the blog that I like - and that looks OK on different pc screens. So I've been changing the design a lot in the last few days.
I was quite confidend with the colours yesterday, if not with the boring layout - but when I returned to the office today it was quite a shock to see them: Instead of the nice creamy yellow my screen at home showed me, here everything had a pinkish hue. Not my favorite colour in the world :-(

I'm still new to blogging and I was trying to use one of the ready made designs for the blog, but some way or the other all of them are not what I was looking for.

To all you experienced bloggers who might read this: Is there any other way?  

2010-06-23

How to calculate along lines - Rechenbuch (part 1)


A Rechenbuch is a kind of calculating manual, dating from medieval or renaissance times...
This book is a reprint of one of Adam Ries works "Rechenbuch auff Linnien", printed as a follow-up edition in 1578. Although the original text is from the middle of the 16th century, the cover should look like a simple no-nonsens binding from the 15th century. Sturdy, practical, not too expensive - the right thing for a clerk around 1476 who would have need of such a Rechenbuch.
 
I started by discarding the modern book cover and taking apart the modern binding. After that, the book was just a little heap of pages, folded and stacked into sections. Now I could start again, just as if it had recently come from the press :-)

The binding and cover will follow the technique and design of this little book: Ephraem Syrus: Sermones from the 15th century, a small volume with wooden boards and a simple leather cover. It measures 14,5 by 10 cm and has 99 leafs.

The Rechenbuch is 16 by 10,5cm and has 114 pages, so not exactly the same, but very similar in format.

 I used 5 raised bands cut from chamois leather just like on the Sermones, which is quiete a lot for a book that small. I think the medieval bookbinder wanted to make really sure this binding would last - well, it did for almost 500 years :-)


Above you can see the sewing over the raised bands, the spine has been glued for the first time and is ready to have the headbands sewn on.
As the book is so slim, I needed the help of two turned wooden jars I use to store dryed glue and polishing chalk to make it stand up. Again I'm amazed about the beauty simple things like tools or containers have, when they are handmade!
 
To the right you can see the book lying on a small book bag with tassels, handwoven from madder and tansy dyed wool. Another lovely little detail that makes medieval bookbinding such fun :-)

Speaking about little details - here`s a preview of the brass clasps and mounts that will decorate the leather cover:

The clasp is still burnished as it was produced to replace a missing clasp on an original medieval book during restoration. I gladly use these replicas, but I polish them before use till they gleam.
The little semipherical mounts will be on the front and back cover near the corners, they prevent the leather from contact with the table or bookshelve surface.

Some books have a similar mount in the middle of the cover, some have a more eleborate flower, cross or rosette to add a little decoration.
When you look closely on the cover of the Sermones, you can still see the tiny holes in the leather left by the long gone mounts...

Enough for today, I`ll keep you posted :-)

Girdle book (part 3)

Here are the dirty details as promised in part 1 :-)

First, an overall view of the book, lying on the cream-coloured chamois I'm going to use for the inner book cover, under the textile book cover that really forms the Beutelbuch.
You can see the three raised bands on the spine, that is the hemp cords the sections are sewn onto. The ends of the cords were frayed so they really lie flat when pasted to the oak boards. At the ends of the spine you can see additional cords called headbands. Those were sewn onto the spine ends after sewing the sections to the raised bands. At this time, they don't look very decorative as you can see in the next foto:

 It's just a plain cord lying on top of the pages...

"What for?" you may ask - but this is just the first step :-)
The headbands are used for different purposes. On some books, the leather cover is sewn to them to fix it and to protect the spine from dirt. Not very pretty, but usefull...
The headbands can also be a decoration AND a protection for the book, when headband and leather cover are fixed together not with plain sewing but with one or more strips of leather braided over the headband and through the leather of the cover. This very prominent braid can be the same colour as the leather or a contrasting colour or it can even be a multicoloured design.
But those leather braided headband are not very practical if you want to put a book upright on a shelve as it is normal today...

For a girdle book, this also does not work, at least not for the outer cover.
The next option is to wrap the headband with thread before you cover the boards with leather - and this is what I  did here. As the outer cover is going to be silk fabric, I used silk thread instead of the more common red and white linnen thread for the headbands.

The actual design is not taken from a surviving book, this is just my idea what would look nice when its peeking over the top of the pages when you read the book. Surviving examples often show a very asymmetrical arrangement of colours or are just executed in one colour. But I liked the two dark red stripes in the green silk wrapping to be almost symmetrical (I didn't measure with a ruler or something, I just changed colour when I thought fit. When you look at medieval books, precision to the millimeter seemes to be a concept totally strange to the medieval bookbinder...)

The next steps will be: Putting another layer of glue unto the spine, covering the boards with the (inner) leather cover, attaching the clasps and finally putting on the (outer) silk cover that will extend over the lower part of the book and have a turkish knot on the end...

Way to go, I think I'm almost halfway through :-)

2010-06-10

Girdle book (part 2)

Here are some fotos I recently took in St. Annen Museum in Lübeck:

 
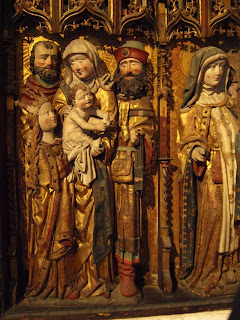
Its the Altar of the "Gertrudenbruderschaft der Träger" (Gertrud brotherhood of the porters) from 1509 and it shows St. Anne and the Holy Kinship. Two of St. Annes relatives are carrying a girdle book :-)
Here you can see the two possible methods in "wearing" a girdle book - in your hand or tucked through your belt.


 A really nice details is the red colour of the cover the lady is wearing through her belt in comparison to the simple black cover of the other girdle book. Note the folds of the cover under the clasp - the leather extends the cover on all sides, not just on the lower part. This way the book is completely protected all around.
The little circular mounts on the front and back are also a protection besides beeing decorative: When you put the book on a table, only the mounts touch the surface, the leather (or in my case, even more important the silk) doesn't come in contact with it.

I already bought little mounts for the book from Lorifactor. Cute little brass flowers originally intended to be belt fittings, but they look just like the ones used for books :-) 

Girdle book (part 1)

Last weekend in Quakenbrück I had the time to work on some book projects while I was explainig medieval bookbinding techniques to the public.
As there is always some spare time while the book sits in the press and you have to wait for the glue to dry, I normally work on two or three books in turns.

This time, I worked on a small Rechenbuch I already mentioned in an older post and on a small girdle book.
Girdle books are a special type of medieval binding where part of the leather cover extends over the wooden boards and hangs down freely from the lower part of the book when reading. The end of this cover extentions is often gathered by a (turkish) knot which could be tucked under ones belt to carry the book around and still have ones hands free.
Besides rather plain prayer books for the lower clergy and merchants account books this type of binding was also in use in a more elaborate form for Books of Hours for well-to-do persons.
And this is what I'm working on at the moment - instead of a plain leather cover the girdle book will be bound in lovely fabric such as silk velvet or multicoloured damast silk (I haven't decided yet...).

The inner construction of the book is no different from that on a "normal" medieval one without the cover extentions. In fact a lot of girdle books were nothing more than a standart binding with leather covered boards and had an additional cover with extentions over the first one! Ecspecially for girdle books with a delicate textile cover this is very useful - if the textile fades or wears out, there still is the sturdy leather cover underneath to protect the book.


So I'm going to make a little leather bound book with some blind tooled decoration and then cover it with nice fabric so that nobody is ever going to see the decorated leather cover :-) Sounds a bit silly, but hey, this is what they did...
You can see the inner cover with decoration on the girdle book to the right - the open flap to show whats under the outer cover is a modern addition...
To give you a quick glimps on the progress:


This is me, taking a sip (it was really hot on sunday with the sun shining into the market stall / workshop) while sewing on the headbands. The sections (folded pages stacked into each other) are already sewn to the cords, the cords ends are pasted to the boards and the spine got its first layer of glue...
I'll show you all the dirty details in part 2 :-)


2010-06-07

Hood, jerkin & hose


Back from Quakenbrück I want to show you the 1480 clothes I already mentioned. They are not totaly finished, but wearable: Some details like 3 more buttons at the front of the jerkin and one button on each sleeve are still missing, the laces for the hose are "under construction" and the hood has no lining. So for now just a quick overall look, pictures of the clothes in detail will follow.

Looking at the pictures I'm again amazed by the vivid colours you can get out of natural dyestuff. The orange was really blazing in the sun and the blue is very lively. I think this is just the right combination. A big "Thank you!" to David from Rubia Pflanzenfärberei for this great work!!

2010-05-31

Sometimes its hard to be a woman...

No, I'm not suddenly into country music ;-)
It's just that I find myself in the situation many a medieval wife with her own small business to attend to may have known: The husband needs something new to wear and suddenly 24 hours in a day are not enough to take care of all the chores, so some things have to wait. Unfortunately that means my book projects ...

Ok, I persuaded Andi to join me in late medieval living history, so naturally I won't leave him alone with all the sewing. And I really like making historical clothes :o)
Last year he joined the event in Soest in a mixture of clothes he had borrowed and some he had made himself. Now it's time for new clothes!

As he is going to portrait a rope maker and beekeeper around the year 1480, the set of working clothes is rather simple and somehow oldfashioned. It consists of shirt and braies, single leg hose fastened to a doublet without sleeves, a buttoned coat / jerkin and a hood.
Hose and hood are made from a 2/2 twill, dyed with madder to a reddish orange, the coat from a slightly finer woadblue 2/2 twill. Shirt, braies and doublet are made from handwoven tabby linen (and also the linig of the coat).

The main source is an altar from Kefermarkt in Austria with a scene ot the "Annunciation to the shepherds" which has a lot of great details. The coat is made after the one on the left, buttoned to the waist with pairs of cloth buttons.

The single leg hose was rather outfashioned in the 1480, but still in use with lower class people. There is a painting showing St. Leonhard and a captive from Bad Aussee where you can clearly see the single leg hose fastened to a doublet.


If you think it's joined hose - have a look at the shirt being pulled over the hose at the front and tucked into the hose at the back - that only works with single leg hose I think.

At the moment I'm doing the last hems, Andi has finished the hood yesterday. So I hope I can show you some pictures after the weekend :-)

Speaking of the weekend: It's going to be fun, we are attending an event in Quakenbrück with a lot of nice people from the Vruntlike Tohopesate and I'll work as a bookbinder the whole time. Finally back to books :o)

2010-04-29

And now for something completely different:


...sheep!

Yes, I breed sheep :-) After looking for the right wool for reconstructing archaeological textiles for a while, I decided to grow it myself. Well, not on my head of course, but on sheep of my own.


It all started with 3 Gute sheep, an old swedish breed from Gotland quite similar to bone and wool finds from the Iron Age. Now I have 12 sheep of 4 different breeds - some purebreed, some mixed. My aim is to supply wool for my own projects from Stone Age to Late Medieval - and enjoy the nice and friendly animals sheep are...


It's been a busy month with all the ewes giving birth to little fluffy kids. But now they're finally all settled in, it's a real pleasure to watch the lambs hob around as only lambs can :-)

I only had 3 ewes with the ram last fall. I bought a young ram at the sheep gathering in september which looked very promising - and his offspring also looks promising!


See for yourself:
The black-and-white lamb is Loki with his mum Edda, he's 75% Gute Sheep, 25% Weiße Heidschnucke.
Then there is Enno with his mum Lillemor ("little mum" in swedish), he's half Gute, half Gotland sheep (a polled breed from Gotland).
And the only ewe lamb this year, Lotta. She's a purebreed Gute shep and halfsister to Edda.

At the moment they grow visibly from day to day; Lotta is the oldest with 3 weeks and her wool is beginning to change colour. Most Gute lambs are born black, but only face and legs stay black, the wool normally changes to a light till medium grey while growing. Both rams and ewes are horned and Lotta and Loki already show little horn stubbles. Maybe Enno is going to stay polled, the chances are 50/50 as his mother is polled and his father Birger sports a set of beautiful curved horns...

2010-03-13

Soester Fehde - "Sturm auf die Stadt"

Here are some fotos I took during the Soester Fehde-Reenactment 2009 on sunday, the 23th of August:


Reading the "Kriegsordnung der Stadt Soest" to the defenders of the city


The defenders are ready


loading a handgonne


on station with the canons


Attack!


trying to go over the citywalls


You're not gonne go over my part of the wall!


They've got a cat!


But now it burns...


breakout of the defenders


treating the wounded


Soests burgers plundering the dead attackers


cleaning up after successfully defending the city